Showing posts with label Christmas. Show all posts

Friday, 13 January 2012

Christmas Gift Tags


This is going to be my first 'January' effort for the Make A Month 2012 Challenge, although, in many ways, it seems almost like cheating as it is very, very simple!

When putting away the Christmas decorations on the 6th January, I hate throwing the cards away! Instead, I use them to make Christmas gift tags for next Christmas. In doing this, I am following what my Mum always did and it has become very much a Christmas tradition with me as well.

It is very simple to do! All you need are the cards and some pinking shears. If you want to be 'posh' and make gift tags with little cotton ties, you would also need a hole punch and some thread ..... although I don't bother myself!.

How do you go about this? Well, you first need to carefully look at each card and where it's been written on to see if it's suitable.

 
This is one I discarded! You could possibly make a 'jokey' gift tag for an adult, but this isn't to my taste!

This one has much more potential. In particular, the top right-hand of the picture with the 'Christmas Wishes' caught my eye.

All I did was to fold the front of the card so the words were central in what will be the front of the gift tag.

I then used the pinking shears to cut round what will be the edge of the tag. A word of warning at this point! Only use a pair of pinking shears that you don't want to use for fabric! After using them to cut card, they will be useless for fabric! Believe me, I've done it! I actually ruined these pinking shears in this way, so this pair is for card only and I have another pair for fabric! Also, it may be because these pinking shears are old and quite heavy but cutting card with them is quite heavy on the hands. Be prepared to take a rest every now and again!

Here's the finished tag. As I said, you could punch a hole in the top left-hand corner and tie some thread through it, especially if you wanted to make these as a fund raising item. However, I don't bother with this! When I actually come to use the gift tag, I stick it onto the present with some sticky tape.

The finished tag from another angle!

With this card, The 'Merry Christmas' was all I was interested in.

So I had to fold the card this way to get the tag I wanted ..... one with a fold at the top.

A simple but effective tag that would look good with a solid coloured wrapping paper.

For this one, I only wanted a portion of the card with the snowflakes in the top right-hand corner.

So I have to eye-ball where the card needed to be folded as you can see above. You'll be amazed how quickly you can see the possibilities with any given card!

Again, a quite elegant gift tag. Although with the examples I've shown, I've only cut out one tag from the cards, in practice you will possibly find you can make several gift tags from each card. It all depends on the picture really!

With some Christmas cards, like this one, there may not be an obvious fold-line to produce a folded tag. However, this jolly snowman can be turned into a nice gift tag for children.

Just cut round the outside edge of the snowman. To use this one, fold the white pom-pom of the hat. You can write on the other side of the snowman and stick the tag to the present using the pom-pom as the anchor point. Of course, you could use a hole punch to make a hole in the pom-pom and thread through some thread to make a threaded gift tag.


So ..... after a couple of hours work, I have a nice selection of gift tags for next Christmas.

I probably could have make many more from the cards I had, but this lot is plenty enough for me!

Also, the eagle-eyed might spot something else I managed to salvage from my Christmas cards in the bottom left-hand corner. Two pieces of ribbon, a button and a little Father Christmas charm. All will come in handy at some time or other :)

Saturday, 24 December 2011

Finished the Christmas Tree Decorations ..... Just!

Phew! Just about made it! I finished the Christmas tree decorations of Minstel and Flossie to give to James and John.


I finished Minstrel first. For both of them, I used a design I found here. I searched everywhere for a simple, cartoon like design, aware that when cutting felt the design needs to be simple shapes. As a reminder, here's what Minstrel looks like .....

A simplified approach to his colouring but I'm pleased with it :)  I was especially keen to portray his spider-like eyebrows and get the black circle under his chin.

The back says from Mum and Dad as Minstrel is for James :)

Now, Flossie was more of a challenge, given that she is a tortie and a real mix of colours. As a reminder..... here she is :)

I had to severely simplify her colouring but I think I've just about captured 'essence of Flossie' :)

Zooming in a bit closer, I've included a black line around her eyes as one distinguishing feature she has is what almost looks like black eyeliner round her eyes. Her eyebrows are much shorter than Minstrel's and go straight up. If I could have, I would have made her whiskers more luxuriant as that is a key feature of hers. I've also included the little black bit on her nose and the black spot on her chin.

All in all, I'm very pleased with how they have turned out and they were well worth the effort of making them.


By the way, they are both about 9cm high.

Finally, when I last posted about the tree decorations I was making, I showed am image of a pink one that was in the process of being made. Here's that pink one as a finished decoration.


Now .... I'm off to finish wrapping my Christmas presents!!

Thursday, 15 December 2011

More Christmas Decorations

I've been steadily carrying on with making Christmas tree decorations for close family members.

With this one, the central ribbon band is using some lovely ribbon that was very reasonably priced in Lidl.

Along the top and bottom edge, I have sewn small golden beads. The curvy loops are chain stitch with small pearl beads sewn in each loop.
The back has the same type of greeting as with all the other ones I've made.

This one is destined to go to my brother and his wife. 

The one I have just completed today has been a bit of an experiment.
My sister-in-law and her husband are both keen fishermen (or should that be fisherpeople?) and I wanted to make an ornament shaped like a fish. I realise a fish is not the first thing you'd expect as a Christmas tree ornament, but they really do love fishing ..... and, anyhow, a fish is a Christian symbol so I think I can get away with it at Christmas!

So far, my work with felt makes me tend towards simple shapes that are easy to cut! So I searched round the Internet and eventually found a cartoon fish drawing that I based my design on.

OK .... no fish I know has lips like this! I have also used silver beads to outline a few scales and red beads to add detail on one of the fins. Still, I really rather like her ...... with those lips, it must be a 'her' don't you think!

Of course, there's the usual greeting on the back :)

I think she looks quite cute and I hope they like her :)

Monday, 5 December 2011

Christmas Is Coming ......

.... and thoughts turn towards Christmas cards and presents.

Last year, for the first time, I cross-stitched Christmas cards for close family members and I was really pleased with the results. However, at the time, I thought it would be rather a shame if people threw the cards away (heaven forbid!) and could see how they could be turned into Christmas tree decorations quite easily.

I wondered whether this year I could directly create Christmas tree decorations so they could serve as a 'Christmas card' but then be kept.

Earlier in the year, I joined the site called Creating the Hive after a recommendation from another blogger. This is a brilliant source of creative inspiration! Through this, I found a post on a blog which gives free PDF patterns for felt Christmas tree decorations. In their examples, however, on the back of the ornaments they use fabric sheets that can be printed on to produce 'labels'. I haven't got any of this fabric paper, so I decided to stitch a Christmas greeting on some cotton material I had using simple back-stitch with one single strand of embroidery cotton.


The red and green flower pattern ornament was the first one I did.


When I recently looked after my little eight year old god-daughter, Hannah, I asked her what colour felt she'd like her ornament to be made from, and she chose pale blue. This was the second one I made.


She then had the brilliant idea of making one in a star shape. So that was the next one I made.

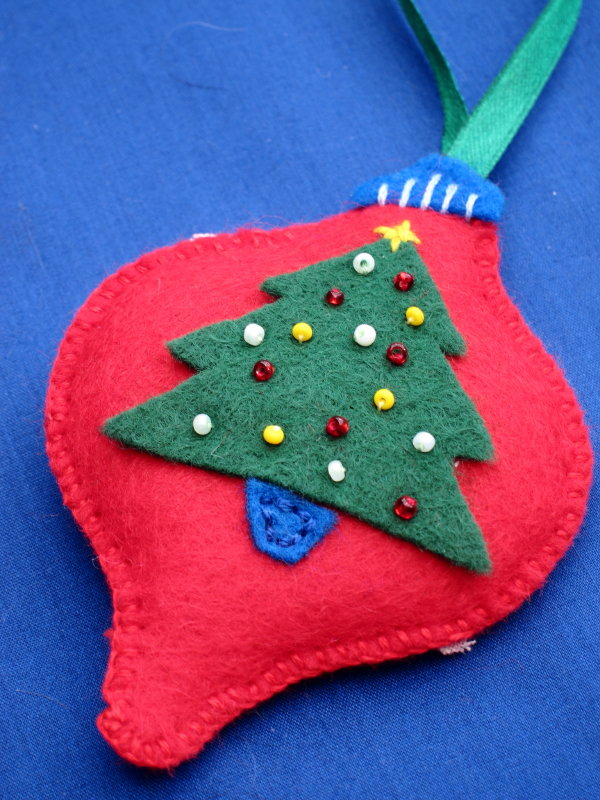
The last one I completed I used felt to made a Christmas tree decoration on the 'bauble'.


I'm currently working on a pink one using ribbons as well as beads. I think it will be going to my nephew who lives in a very 'girlie' environment of his partner and two daughters!


I have several other ideas for different members of my family. For my sister-in-law and her husband who are both keen anglers, I think I will do a fish shape. For John and James, I have an idea to try and do two ornaments in the shape of a cat's head and try to make one have Flossie's colouring and the other be like Minstrel. This might be easier said than done ...... so watch this space!
Related Posts Plugin for WordPress, Blogger...