Showing posts with label sewing. Show all posts

Saturday, 28 January 2012

A Bits & Pieces Kind Of Week

Yet again this past week I've been struggling with a cold/catarrh so it is an effort to do anything and I feel tired all the time. However, although I feel in the doll-drums, on reflection, I've got quite a lot done this week. I mentioned in my last post that John made some candles in memory of my Dad and here they are. We continued to burn them last Saturday. They are blue and white although the white looks rather golden here for some reason. You'll also have to take it from me that they have a wonderful vanilla smell. On second thoughts ....... I'll take it from John that they smell heavenly, since I can't really smell anything at all at the moment!!

What on earth is this? It was bread soaking in water! I was expecting my god-daughter, Hannah, to come over last Saturday. I love her coming over and I always like to do something special with her. Since I've been trying to loose weight, we seem to have a lot of unused bread around. To be honest, the birds are beginning to get fed up with bread, so I thought Hannah and I could make some bread pudding. Yes ...... I know ...... if I'm on a diet, do I really need bread pudding around? Probably not! However, it could always go in the freezer if it looks too tempting! So, since the bread was a bit hard, I started it soaking quite early.

In the end, Hannah didn't come round but I obviously had to go ahead and make the bread pudding. I have always used a simple recipe from my Mum. I have no idea where she got it from, but it is as follows:

Bread Pudding:
Ingredients:

4oz butter or margarine
4oz dark brown sugar
1lb bread that has been soaking in water
1lb mixed dried fruit
1tblsp mixed spice

However, because I thought it's a given that I'm going to try a piece (!) ...... I wondered if I could make it with slightly fewer calories and so I tried a little experiment.
I only used 3oz margarine and 2oz sugar and then worked out how many teaspoons in 2oz sugar and dissolved the appropriate number of sweeteners in a little bit of hot water to take the place of 2oz sugar.
I also decided to add 2 stem gingers and cut them up really small to add to the fruit. John likes ginger :)

  1. So ..... how to make it! Set the oven to 200 degrees C.
  2. Cream together the margarine and 2oz sugar until fluffy.
  3. Squeeze out as much of the water as you can from the soaking bread and add the bread to the margarine and sugar mix. Squeezing out the water can be a bit messy! Don't worry if you think there's too much water; it just might increase the time required to cook.
  4. Add the dissolved sweeteners, dried fruit, mixed spice and chopped up ginger and mix everything thoroughly.
  5. Put mix in a lightly greased baking tray and cook in the oven for about 1.5 hours. Please note that the surface fruit can get easily burnt, so it is a good idea to cover the tray with foil.
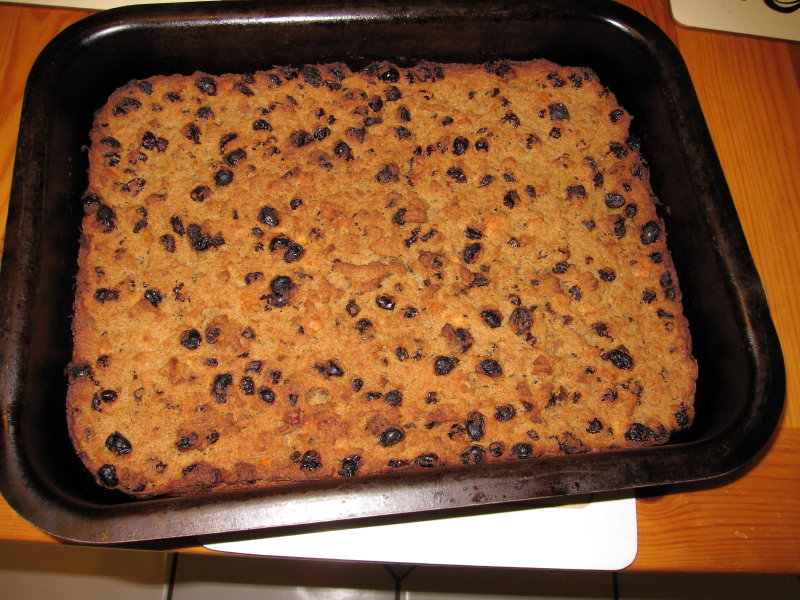
And voila! Bread Pudding! Let it cool a bit before cutting out pieces to serve. If I wasn't on a diet, I would also lightly dust with caster sugar, but to be honest it doesn't really need it ...... and that extra sugar really isn't good for you :)

Yummy! It's probably best when it's warm but it keeps for about a week and pieces can be easily warmed up in the microwave. It rarely actually lasts a week :)

Did the alterations to the ingredients work? Well ..... both John and I (don't mention the diet ......... my bit was small) tried a piece and it was great! The change had no effect :)

Here's something else I managed to finish this week; a knitted scarf/shawl.

Excuse the awful photo of me ..... not feeling well and no makeup is not flattering!

Anyhow ...... the knitting ....... I'm not really a knitter to be honest! A friend's Mum did teach me basic knitting when I was about 7 years old but I've never got on with it and knitting patterns always look like advanced Russian to me! However, back in April last year, I won a lovely give-away on Joy's blog and it included some lovely but unusual yarn that I just didn't immediately know what to do with. You can see what it's like in the photo below:

It's more like string with fluffy bits every now and again! I did wonder if I could crochet with it (crochet I can do even if knitting escapes me), but it didn't look like it would be good for crochet. Then, back in November, I wondered if I could just try using 'knit' stitch to make a scarf using the biggest knitting needles I had. I am lucky in that an Aunt gave me loads of knitting needles when I was little and I've never thrown them out!!

So ...... I just cast on 60 stitches and started knitting! I found that this yarn is quite rough on the index finger of the right hand, so I had to wear a protector finger bandage to stop getting a blister! I have got into the habit of knitting whilst watching things on the TV! It's been quite a relaxing thing to do ........ unless Flossie has been anywhere near as she takes great delight in chasing the moving yarn or the knitting needles! Since I got 5 balls of wool, I decided to use 2.5 and see how long it was and this is the result! It makes a pretty good loose weave shawl or scarf. I'm going to use the other 2.5 balls to make another one :)

So thank you again Joy for the yarn. It's been fun to use :)

This week I've also managed to finish de-cluttering our smallest bed-room with a view to making it into a little office for myself. I don't have any 'before' photos! You'll just have to take it from me that it was a mess! It was a dumping ground for all sorts of stuff, including a lot (and I mean A LOT) of needlework materials I inherited when John's Mum passed away 2 years ago. I have actually been sorting things out since the beginning of January ..... and can't believe how long it's been taking!

Here it is, almost done! All of the needlework and crafting stuff has been carefully sorted and boxed in plastic storage boxes and put in the wardrobe in this room (you can't see it here) and the desk is all ready for use! But ...... those curtains! They were a make-shift that John's Mum gave us when we moved in ........ Too long for the window and a rather tacky crimplene-type material! Not nice but they have done for now!

However ..........

in our local Charity shop, I found some rather nice curtains that had clearly never been used! They only cost £7.50! They are not lined, as you can see, but perfectly adequate for what we need and actually look quite good in the room. In practice, they don't look quite as thin as this photo seems to suggest!  I actually bought them because the material caught my eye ...... but now I could see that keeping them as curtains was probably the best idea. Here I was hanging them just to work out how much material to cut off :)

I've never actually altered curtains before! I measured, measured and measured again and carefully noted how the original hem was done so I could copy it exactly! However, I found that my machine had a bit of trouble sewing through certain areas where there were several layers of fabric. Possibly it needs a new needle? The stitches kept jumping and creating a thread tangle underneath. In the end, I used the machine for the bits it could cope with and hand sewed through the thick bits ...... and it was thick!

All done and looking much nicer! One final thing I did this week to complete this room was to file away a lot of paperwork that had been accumulating over ...... well ...... I dread to think about it! But it was a few years! I then had LOADS of stuff for John to shred!

Here's Minstrel beside the bag of shredded paperwork to give it some scale! It will get gradually added to our compost bin!

Phew! A busy week!

And I must share this one final photo! Minstrel as a techno-cat :)

He does like to help :)

Monday, 5 December 2011

Christmas Is Coming ......

.... and thoughts turn towards Christmas cards and presents.

Last year, for the first time, I cross-stitched Christmas cards for close family members and I was really pleased with the results. However, at the time, I thought it would be rather a shame if people threw the cards away (heaven forbid!) and could see how they could be turned into Christmas tree decorations quite easily.

I wondered whether this year I could directly create Christmas tree decorations so they could serve as a 'Christmas card' but then be kept.

Earlier in the year, I joined the site called Creating the Hive after a recommendation from another blogger. This is a brilliant source of creative inspiration! Through this, I found a post on a blog which gives free PDF patterns for felt Christmas tree decorations. In their examples, however, on the back of the ornaments they use fabric sheets that can be printed on to produce 'labels'. I haven't got any of this fabric paper, so I decided to stitch a Christmas greeting on some cotton material I had using simple back-stitch with one single strand of embroidery cotton.


The red and green flower pattern ornament was the first one I did.


When I recently looked after my little eight year old god-daughter, Hannah, I asked her what colour felt she'd like her ornament to be made from, and she chose pale blue. This was the second one I made.


She then had the brilliant idea of making one in a star shape. So that was the next one I made.

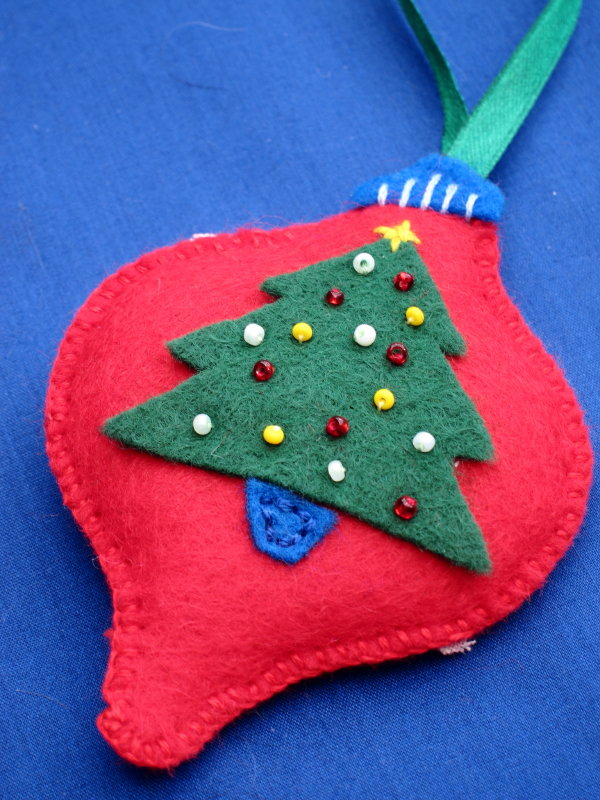
The last one I completed I used felt to made a Christmas tree decoration on the 'bauble'.


I'm currently working on a pink one using ribbons as well as beads. I think it will be going to my nephew who lives in a very 'girlie' environment of his partner and two daughters!


I have several other ideas for different members of my family. For my sister-in-law and her husband who are both keen anglers, I think I will do a fish shape. For John and James, I have an idea to try and do two ornaments in the shape of a cat's head and try to make one have Flossie's colouring and the other be like Minstrel. This might be easier said than done ...... so watch this space!

Saturday, 2 July 2011

My 2nd Ginger Skirt ..... Or Is It Curtains?


Another post that I started back in July but didn't get round to posting!! Oops again!

Still ..... aught to record my second Ginger skirt even if it did take until 4th October to actually finish the post!!

My son, bless him, on seeing this skirt said 'Didn't we used to have curtains like that once Mum?'. You could go off him, couldn't you :) However, subconsciously, this comment may have had an effect as I haven't really worn this one! Mind you, although I do like the print, it is a bit difficult to find a suitable top to go with it. I'm possibly a bit too old for a bright yellow t-shirt? But I haven't been able to find a t-shirt in either the pale or dark brown you can also see in the print.

A Hat Experiment

Top Section of Sun Hat

Do you like hats? I think the 'correct' response most ladies are supposed to make is 'yes'. My sister in law, Lynne, delights in wearing hats and indeed always looks very glamorous wearing one. I'm actually sure that the main attraction for her in a wedding or a christening is the opportunity to wear a hat! Of course, weddings are the main event when hats get worn nowadays. This was most obviously evident at the recent Royal Wedding and who can forget the amazing 'hat' that Princess Beatrice wore? However, I was saddened by the vitriol some of the press gave to Samantha Cameron, our Prime Minister's wife, because she didn't wear a hat. It did cross my mind that she suffers from the affliction I have ........ a Big Head!!! :)

Yes ....... I can quite safely say that I Hate Hats  ......... because they never (almost) EVER fit!!!

When my brother got married a couple of years ago, when Lynne found out that I wasn't going to wear a hat, I think (bless her) she thought that perhaps I couldn't afford to buy a hat and offered me free range to look through her vast hat collection and borrow whatever I liked. To humour her, I did indeed look ....... but I knew what would happen. Sure enough, there was one that would have gone perfectly with the dusky pink suit I'd bought from Jacques Verte ...... but whereas on Lynne it fitted low over her brow in an almost 1920s style, with me, it perched on the top of my head in a wobbly way and one backwards tilt of my head and it was off!! Well ..... you could only laugh :)

Underside of hat, showing lining and the rip that led to James throwing these jeans out!!
Nevertheless, there are times of the year when I do have to wear a hat and that is on holiday or when out for long periods in the sun. You see, I was born a Ginger and, although the hair colour has faded and only resembles auburn thanks to the clever colouring skills of my hairdresser, I still have the fair skin that goes with being ginger and ..... boy oh boy ...... I burn very easily. 
The reverse of both layers of the hat
In my teens, our summer holiday was always accompanied by The Hat Quest! The quest to find a sun hat with a wide enough brim to shield my head and neck that would also fit! I did have a lovely straw one that was perfect and lasted for several years. However, being made of straw, it eventually started to show bad signs of wear requiring The Hat Quest to begin again.

My Mum (bless her) should have been a Girl Guide! She always has a tape measure in her bag and she would automatically measure any sun hat she came across to see if it was likely to fit! It didn't matter what it looked like! If it was big enough, it would do! Sigh!!

Of course, the observant might recall that on the 42 mile sponsored walk, I AM wearing a hat. Well, that hat is very special. Thanks to my ever observant Mum, she found an advert in one of her magazines that actually had head measurements for ladies hats. This sort of advert was (and is!) incredibly rare! Thankfully, they had my size and that beautiful cotton hat has been my saviour ever since. It was bought way, way prior to the Internet and I think the company no longer exists ...... so it must be well over 21 years old (I'm sure I had it prior to James' birth).

Anyhow, it is bearing up well but can't last for ever. John found a pattern for a sun hat and wondered if I would be interested. However, it is designed for a 21 inch head and mine is 24 inches! So ...... here comes the experiment ..... this is 9% bigger so I asked John to increase the size of the pattern pieces by 9% in Photoshop and thought I'd give it a go and see how it turned out.

I used a pair of James' jeans! They weren't very old but he'd ripped a tear in one of the legs and didn't want them. Seemed like the ideal material to try. I also made another change; my interfacing is only of medium weight so I ironed interfacing on both layers of material for the brim. I did really want to embroider some flowers in a hippyish sort of way over the denim but, given that I wasn't entirely sure the pattern would fit, I thought it would be best not to do this at this stage. This version is very much a trial run!

The instructions and photos are very clear and easy to follow. I made it up over the course of a couple of days and actually finished the last little bit last night.

Looking slightly manic wearing hat!!
How is the fit? Actually, not too bad. Funnily enough, it could possible do with being a little smaller round the head. I think I am going to have to sew in some ribbon ties as a gust of wind will blow it off!
Recognise the lining? From My first Ginger Skirt
Side shot showing crown
The crown could possibly do with being a little bit deeper. However, I'm quite pleased with how it looks. It would work well as a sun hat and would keep the sun off of both my face and my neck.

Doing a Witchy-poo impersonation. Flossie not amused :)
This last picture might mean it gets called the Witchy-Poo hat  .... but, I guess, if the hat fits ....  :)

Saturday, 4 June 2011

My Newbie's Ginger Is Complete!


I'm a bit late getting to Sunni's Ginger party, but better late than never! My version has the waistband of version three of the pattern but it is like versions 1 and 2 in that the fabric is not on the bias. As you can see, I am slightly short in the body so I didn't really want to make the skirt with the higher, shaped waistbands of versions 1 and 2. Also, although Sunni had some fantastic ideas for adding embellishments like piping and pockets, I decided in the end to keep things simple as this is my first skirt and just keep it plain as far as the making up was concerned. Since this material has such a definate pattern, I didn't think it would look boring and need anything extra.

However, I am delighted with the fit! It has actually made me realise that I haven't had a skirt that fits me well for ...... well, forever!

As a genuine newbie, I am so glad I came across Sunni's blog and decided to get involved with the sewalong. It has given me so much confidence to carry on sewing!


I found it quite easy to follow Sunni's instructions on tailoring the pattern. I had to tailor for size 12 on the waist but size 14 on the hips.


The invisible zip has come out really well. It was the instructions for doing the waistband that 'foxed' me for a while but I just tried it out with pins first until it made sense and then went with it. It all worked out in the end!!


I was a bit lazy with the hem in that I didn't do it by hand ie an invisible hem, as I recall being taught when at school eons ago :)

I sewed it all the way round with a straight stitch. After all, just about every skirt you see nowadays is done that way and it has come out well. Please note ..... the hem does look wonky here ...... it really isn't !! It was a bit breezy in my garden this morning and the skirt kept blowing round my legs!! :)

All in all, a fantastic experience! I have some other material to make some others, one is a nice yellow floral print (not the same as this one) and the other is a plain blue material that I might embellish with embroidery ........ so thank you again to Sunni for getting me past being a completely newbie sewer :)

Thursday, 2 June 2011

Not Quite So Gingerly - Starting With the Main Material

Although I had already pre-washed and ironed my black and white cotton material, I gave it another iron both to fold the material so the right side was inside and also to get rid of any slight fold creases it might have where I'd had it folded up, ready and waiting!
But, I then thought to re-read the instructions on how to double check that the main pieces are in line with the grain ..... and realised I had the fabric folded the wrong way as it had to be selvedge to selvedge!! Ooops! So, re-fold and re-iron!


Then, I noticed that where I had hung the material on the line to dry, the material had been stretched out of line ..... see where I'm pointing to? I decided to avoid that section so as to make sure all the pieces were truly cut on the grainline. Luckily, I have plenty of material, so I am OK doing this!

With all the pieces pinned in place, I then cut out! Why do I find this bit so daunting? I guess 'cos if you boob ..... you really do boob at this point! Anyhow, I double-check before cutting ...... and then get on with it. By the way ..... note to self ...... I think I could do with a new pair of shears! Perhaps I'll ask John or James as it is my Birthday pretty soon :)


I also cut out the interfacing and iron this to the waistband pieces.

Then, on to the sewing! I need to wind some of the black cotton onto a new bobbin (and also have to read the manual on this 'cos I've forgotten how to do it!!). I had also made the stitch length the longest it could be for the muslin so I adjusted to the middle stitch length and did a test on a spare piece of material and it looked OK, so I went with that. I had to re-apply the interfacing to the waistband pieces as it had slightly come away from the first time I'd ironed it; it does say 8 seconds, so 8 seconds it got, on every little bit. I'm glad I did that ironing the day before otherwise I would never had realised and doing it when sewn up would have been tricky.


Any differences when sewing with the main material? Well, the cotton material is thicker and therefore heavier and so its more inclined to slide off the edge of the table.


With all the seams done and pressed open, once again ..... the dreaded invisible zipper. I had not been completely happy with the results using Sunni's instructions, so this time I decided to really study the instructions on the Colette pattern site. This hadn't made very much sense before but now I found that they did!! I found that the result was much better although I think I will add a couple of extra hand stitches at the bottom of the zip as this is the point that gets stress.

Now for the bit I've never done before - attaching the other side of the waistband. I think I understand what the instructions are saying but I decided to pin it totally in place first, in place of stitching, to make sure I actually have understood!!

However, stumbling block! When really reading the instructions, some of them don't make immediate sense! Attaching the waistband edge initially was OK but then the next stage, involving turning the edge in on itself again didn't seem obvious. I ummed and ahhed about that stage for ages! In the end, I tried it with pins and turned the waistband inside out and could see it worked out.

Then  ....... next stumbling block! In sewing the waistband facing to the waistband with the interfacing, the needle didn't seem able to cope with the thickness. However, it did occur to me that the needle might be blunt as I don't think I've ever changed it! Luckily, I have some spares and changing the needle did the trick (although again I had to reference the manual for how to do this)! Phew!


Then, to stop the waistband facing rolling out, you need to use a technique called understitching. I read these instructions, tried to follow the diagram in the pattern and then really studied the tutorial on the Colette website but it just didn't make sense! Possibly, not helped by the fact that the tutorial is aimed at doing a neckline and also in its photos it is difficult to tell the difference between the main fabric and the facing. I have to say I dithered here for a long time!

Note to self ..... doing any serious thinking late at night is not a good thing :)

I looked at the other skirt photos that have been posted in the Ginger sewalong Flikr pool and could see that on some, top stitching is evident. Is this top stitching the overstitching? The Colette website seems to indicate that there shouldn't be any evidence of stitching on the front ....... so surely this couldn't be the topstitching? I Googled understitching to see if I could get inspiration elsewhere, but couldn't. In the end, thinking logically about why this stitching is necessary, I did it where you can see in the photo above. Because of the zip, I couldn't go entirely to each end, but the stitching isn't visible and hopefully should perform the function it is there for ie stopping the inside material rolling up, so that's OK.

I then turned the waistband out. The zip looks pretty good. However, I'm concerned that one corner looks like it might unravel ...... remember my machine had problems stitching through all the layers? So I turned it back and oversewed the end by hand. In turning the waistband out again, it looks fine.

I then hand stitched the inside edge of the waistband. Call me odd but I actually really love doing hand sewing! The skirt then gets hung up for the 24 hours required to 'hang' before sorting out the hem. For this, I need John's help!


Today (Thursday) John put pins all round the bottom of the skirt at a specific level. I then cut around where these pins are, hoping that I got it right! The instructions for doing the hem say to press the bottom edge 1/4 inch and then a further 3/8 inch. However, I just can't get this to work! So ...... I just turned the hem up 5/8 inch and pressed that and then went round and turned the raw edge under and pressed and pinned that. This worked much better for me, at any rate! Finally, I machine sewed the hem. I was going to hand stitch it but, on looking at just about every skirt I own, the hem is sewn by a straight line of stitching which is visible on the front. Well ..... I say visible ...... it isn't really in that you don't notice it and it looks nice and neat!!

So ..... voila! It is done! I am really pleased with how it has come out. Here I am wearing the skirt. I look a bit 'washed out' but I'm afraid the not-so-lovely hay fever season is on us and my eyes are suffering a bit.

(Flossie preferring not to be held!!)


I've just realised that I aught to get John to take some real closeups to show the invisible zipper and other details. I think I'll leave that for a post tomorrow or the weekend.

However, I have thoroughly enjoyed doing this sewalong. The skirt is a close fit which is something I haven't had in a skirt for a very long time, if ever! It has given me the confidence to try other clothes sewing.
Related Posts Plugin for WordPress, Blogger...