Wednesday, 16 November 2011

Stitched Picture of James Is Finished


I actually finished this on the 6th November but I have been so busy with other things that I just haven't got round to blogging about it!

How did I go about it? Well .... here are the things I used:


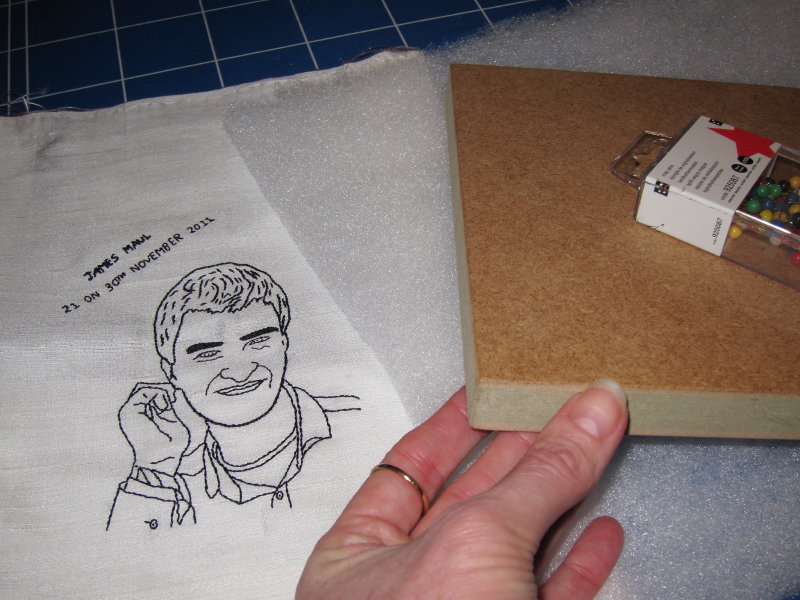
A friend who works in a wood yard got me an off-cut of wood to use as a base for the picture and kindly rounded the edges for me. I recently bought some wadding to wrap round the wood, so as to stop the silk from wearing on the edges of the wood. The map pins were to pin first the wadding and then the silk to the wood to help keep things taut when doing the lacing on the back.

Perhaps the wood is more visible on this picture above.

I carefully pulled the wadding round the wood and did use the pins to keep things in place before starting to sew the lacing with ordinary white cotton thread. I've never done this before but it went surprisingly smoothly. I trimmed the wadding in the corners so there wasn't an extra thick layer in the corner; if you look closely, you can see where I sewed the wadding to produce a sort of mitred corner.

Here you can see the front. I was very pleased with how well the wadding covered the wood.

Here I've laid the wadded-wood onto the embroidery to try and work out how much of the silk I can cut off. When I attached the silk to the embroidery frame, I had to use a piece of silk that was much bigger than the actual design. Still, the little off-cut will come in handy for something! Minstrel is keeping a close eye on me to make sure I don't make any mistakes!

Here is the silk embroidery with the lacing all finished. Getting the corners to lie flat was a bit fiddly but it went reasonably smoothly.

And of course ..........

.... I covered the lacing with a piece of white felt, just slip stitching it in place ...... so you'd never know what was underneath.

And voila! All done :)


The finish isn't quite how I was expecting, in that it bears some similarity to a padded chair seat. However, when on the wall, it looks more modern than the usual type of embroidered picture ..... and that, after all, was what I was really after.

Just hope James likes it :)

Saturday, 5 November 2011

Welcome To Frank!

Here's Frank and he arrived on Thursday, all the way from the USA. He came courtesy of a giveaway run on  the While She Naps blog and was actually made by Wendy Gratz whose blog is called Shiny Happy World.

I have followed While She Naps for quite a while now and love all the crafting ideas she shares on her blog. It was only because of her that I found Wendy Gratz's blog and it is fantastic! As a new follower, I am still looking round all the marvellous 'how-to' videos on her site, but if you have an hour or ten(!) to spare, be sure to go and have a look yourself!

But back to Frank! He is superb! He is so well made and has such a cute expression! Thank you so much to Abby for running the giveaway and to Wendy for making him and sending him all the way from the States. As I found out I had won him just at the point when John and I were about to leave out jobs because of redundancy, Frank is going to be our Good Luck mascot for our new life.

Now, any new entry to the household has to be approved by the cats!

Flossie is the first to inspect the new arrival, sitting in the box he arrived in. Although Frank is doing his best to look scary, Flossie is made of stern stuff.......

..... and doesn't think he's scary at all.

On the other hand, Minstrel gives Frank a thorough examination .....


But, if truth be known, what Minstrel really wants is the box!

There, that's better :)


You are going to have to work much harder at being scary Frank! I think Minstrel is doing a much better job ..... look at those eyes :)
Welcome to the Maul household Frank and thanks once again to Abby and Wendy :)

Thursday, 27 October 2011

Embroidery of James Completed


Here is the embroidery of James completed this evening. I haven't really had much time over the last week or so to do much, but it has stitched up remarkably quickly and I have finished much more quickly than I thought I would.

I was originally going to do extra stitching in the hair area but I'm a little undecided about that now. John thinks it looks OK as it is. I don't want to do extra stitching and then find I don't like it as taking the stitches out will probably mark the silk material.

I think I will leave it be for a while and see if I still feel the same after a few days or so.

I'm going to mount it on a thick piece of block board or something like that to give it a modern feel, without using a frame. A friend is going to hunt out a sturdy piece of wood for me, so I have time for contemplation before doing that final step!

Thursday, 20 October 2011

A Spine Tingling Coincidence

No photo, unless I can find a suitable one later, but a moment occurred yesterday that just shows how strange life can be at times.

Back in July, on Tuesday 19th in actual fact, I was told in the afternoon that Dad wasn't going to pull through from pneumonia. What may have slipped through the net in my blogging was that in the morning of the same day, both John and I were made redundant! Truly this could have been described as a Black Tuesday! Being made redundant wasn't unexpected but, with everything that happened with Dad, it rather slipped into non-importance, if that makes any sense.

Our last day was due to be Friday 28th October. What will we be doing? Well .... I have seen a very part-time job that I would have been daft not to apply for (not heard anything yet!) but, basically, we're going to take some time out. With the redundancy pay-out (generous in John's case as he's been there 26 years!) and our savings, we are hoping to see how things go and spend some time doing the things that we like. You see, having seen my Dad fade away with Alzheimer's over the last few years and we had the same with John's Dad, who passed away in 2001 ....... let's just say it has changed our view on what is important.

Yesterday, we were then told unexpectedly, that we can leave tomorrow!! And then, I went to my PC and read this totally inspiring post from Flossie TeaCakes and thought ...... wow! It so strikes a chord and has several parallels to what has happened to us! We have been becoming increasingly daunted in the last couple of weeks about whether things will work out but reading that really made me think we need to go with our hearts!

John has talked before about starting a candle making business, a hobby he really loves, and I've tentatively said to him that candle making starter kits might be an avenue worth investigating. I love tinkering with website design, although whether I'm good enough to pursue this, I'm not sure!

Still, I'm beginning to think that a leap of faith might just be what is required :)

Monday, 17 October 2011

I Have A Cunning Plan ......

.... that involves this photo of our son, James ..... and will mean the Tiger will slip back into being a UFO for a while :)

I have seen on various blogs around the Internet where people have used photos and turned them into sketches that they have then embroidered. It will be James' 21st Birthday at the end of November and so I thought trying to do this would make an interesting surprise present for him. He doesn't do anything quite so boring as reading his Mum's blog, so I think I'll be safe by blogging about it!

So, since John is my expert as far as Photoshop is concerned, I asked him if he would convert this into a sketch.


I then asked John to print it in reverse so I could then trace the resulting image onto tracing paper using an iron-on transfer pencil. In this way, I would create my own iron-on embroidery transfer. I might add that I did test this out first to make sure it would work!

As for the materials to use, I initially thought I would use a piece of linen I already had and use black embroidery cotton thread. However, when Mum and I went to the Alexandra Palace Knitting and Stitching Show a couple of weeks ago, I found someone selling Silk Dupion fabric and Pearsall silk thread and just immediately knew I had to use these luxurious materials. I've never embroidered on silk or used silk thread ...... but I guess you have to start somewhere!

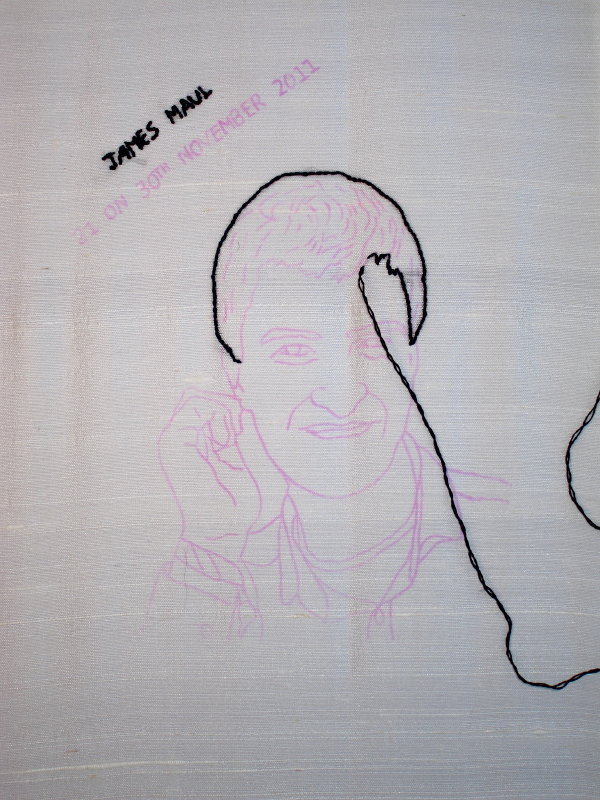
Here's my initial progress after mounting the silk onto a frame and a little bit of sewing last Thursday.

And here's my progress after a sewing session last Saturday evening.

What stitches am I using? Well, the name is whipped back stitch using two strands of silk. I think the lettering is just a little bit too small for this as the letters look a little cramped. I didn't want to un-pick it as I didn't want to damage the silk dupion but it is just about clear. For the rest of the letters, I think I will just use back stitch. For the hair done so far and the face outline, I have used stem stitch with two strands of thread. I've done the same for the eye brows. For the other facial features, I have used just one strand of silk and back stitch. The hand is also back stitch with two strands of silk.

The effect I am after is to produce a 'sketch' but done in silk. By the way, what the photograph doesn't show is the lovely sheen of the silk dupion fabric. I'm so glad I decided to try it. So far, I'm pleased with how it looks.

Friday, 7 October 2011

Eye Eye Mr Tiger!

When I introduced The Tiger the other day, the photo showed how far I'd got before putting it to one side as a UFO. The Tiger was resurrected to go on holiday with us back at the beginning of July ...... and this shows how far I've got to date.

The Tiger can now look at me :)

I can also give the details for the kit. It is called The Tiger and is a Ross Original design from 1998 so, at the very least, I bought it sometime between then and 2005. It is stitched on 14 count Aida and the finished design will measure 12 x 10 inches (30.5cm x 25.5cm).

Once again I seem to have bought a kit with a palette of similarly coloured cottons! When will I learn! However, I have a soft-spot for pictures of cats, both wild and domesticated, and it is fantastic seeing this picture gradually reveal itself as I work down the chart.

Thursday, 6 October 2011

The Rug Fringe Up Close

For all that the last post was to show the completed  fringe on The Rug, the photo just didn't really show it.

So, in what I can almost promise will be the last blog post about The Rug, here is the fringe up close and personal :)


It adds a rustic quality to the finished Rug that I really like
Related Posts Plugin for WordPress, Blogger...